
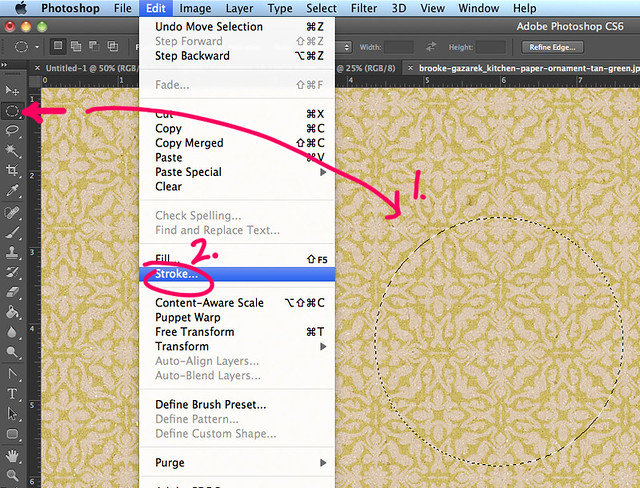
Open a paper in Photoshop.
On a new layer above your paper, use the (1) Elliptical Marquee Tool, and while holding shift (to maintain proportion), click and drag to desired size.
(2) From the Menu Click Edit > Stroke
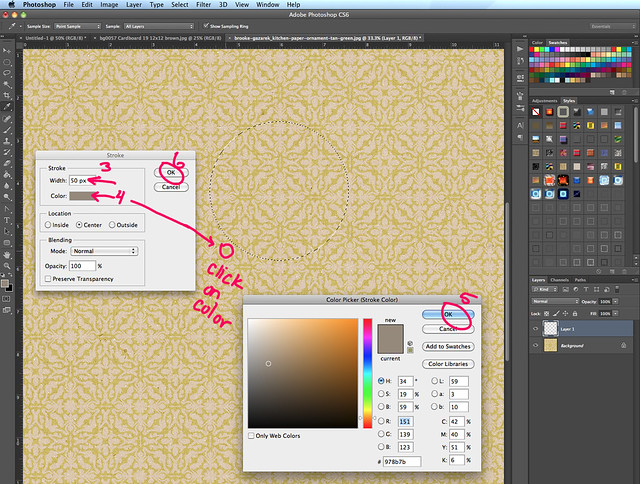
(3) Stroke the selection 50 px (or desired thickness)
(4) Click on the color box. As you move your cursor over your paper it will turn into a dropper. Use the dropper to click on a color from your paper. (5) Click OK in the color box, then (6) click OK in the stroke box.
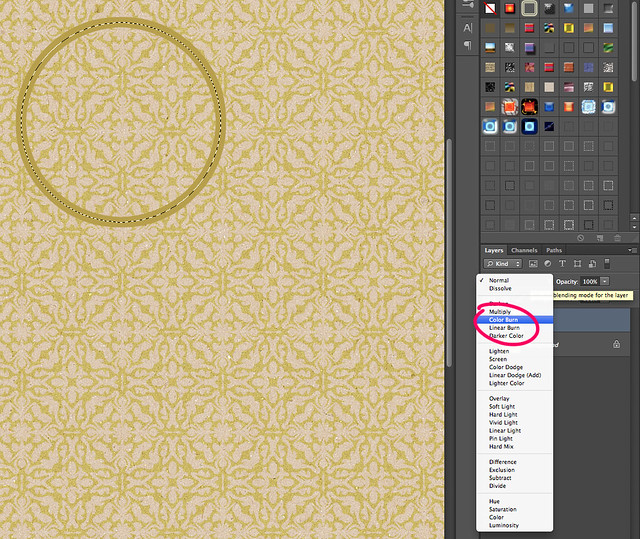
Select Color Burn, layer option, in the Layers Panel.
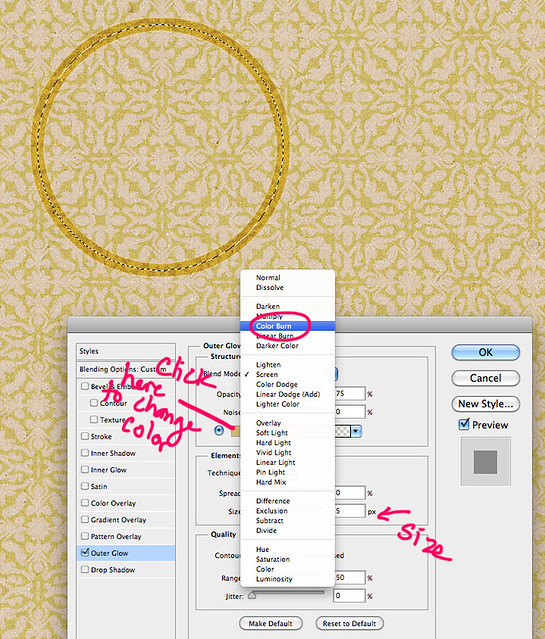
Go to the Layer Styles either from the Menu >Layer > Layer Style > Outer Glow
or double-click to the right of the layer in the Layers Panel - then click on Outer Glow.
Change the color to match the paper just like we did earlier. Then change the Blend Mode for the Outer Glow to Color Burn. Increase the size to desired look.
Do the same thing with Inner Glow.
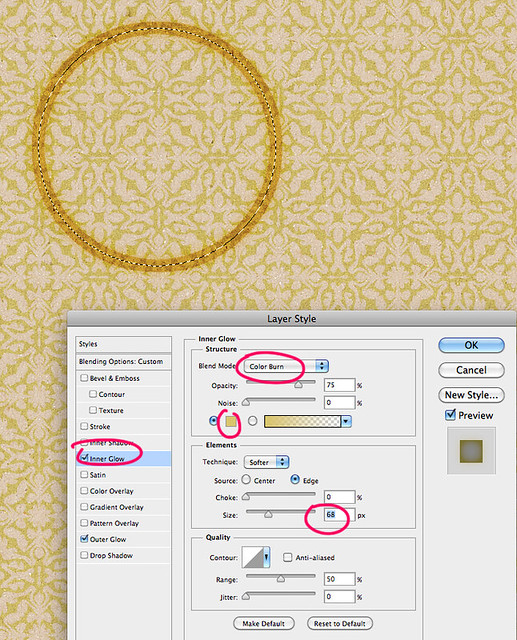
Very important: Click on Blending Options and decrease the opacity of Fill to desired look. Click OK.

You can add to this by painting more splatters or erasing parts.
If you want other stains on different layers. Just make the shape you want and copy and paste the same layer styles onto the new layer. One way is to right click on the right side of the layer with the effects you want to copy - and select Copy Layer Style. Then move your cursor to the layer you want to make a stain, and right click on the right side of the layer and click Paste Layer Style. However, you will need to adjust the Fill Opacity separately for each layer you copy layer styles too.
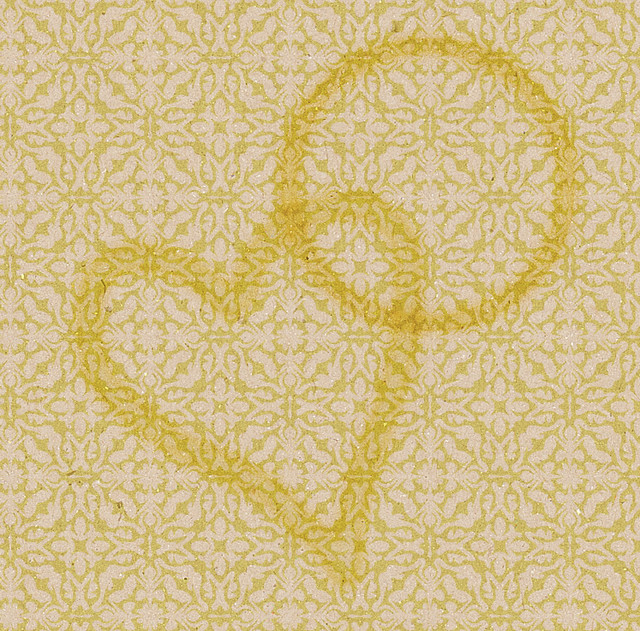
You can make text look stained too. Just play with the size of the Inner and Outer Glow Layer Styles to make your stains newer or older (a more crisp edge will look newer - and a softer/bleeding edge will look like it has been around awhile).
NOTE: If you want the stain a color (different than your paper - maybe a jelly stain or something) - just pick the color you want from the picker for the inner and outer glows - and it should be the same color your shape/text is too.
Brooke, this is awesome! I am just learning PS and your tutorial is just great! I am not very good at "You Tube" tutorials as I like when I can read, ponder, and execute, so this will be great. I hope you don't mind, but I have copied it into Word so that I can print it out for my use. Thank you!
Thanks for the tutorial. I noticed a cool coffee ring stain in one of the blog train kits I down loaded yesterday. I like the idea of making a jam jar ring---grape jelly anyone?
Thanks for sharing your knowledge. This technique will come in handy for the cooking with grandkids pages I plan.
Oh.. love this.. Thanks~!
This is so cool! Thanks!!
@Janet - of course you can print it out. we're here to help you learn whatever works best for you is fine with us.
 but I made those a different way
@Sarah - the coffee stain was from my part of the blog train
Glad everyone is enjoying staining their paper.
For some reason, I have a particular fondness for coffee stains! Thanks for the tutorial, Brooke. Well done!
Thanks for the tutorial. Would this work on the edges of paper to give an inked edge look?
Wonderful tutorial.
@Debbie - yes!
excelente !!!gracias
Thank you for the great tutorial.
Great tutorial. Thanks for sharing!
Wonderful! Thank you for sharing this!
Thank you so much!
Thanks for sharing this! I am looking forward to trying it. I can see using it to "spray" graffiti.
I have photoshop elements 7 (yeah, ancient by technology standards), and I don't see how to do outer glow. Is that not an option with elements 7? Does anyone know how I might be able to do it?
Thank you for your great tutorials!
Definitely! That will be super cute
Off to play and give this a try.
Thank you!!! I'll try this very soon
Ill by trying this on my coffee layout! thanks so much
@Carrie Outer Glow is in Layer Effects>Layer Styles
http://www.designerdigitals.com/digital-scrapbooking/tips/questions/275/How+can+I+add+an+Outer+Glow+to+my+text+in+Photoshop+Elements%3F
Awesome tutorial! Thank you for sharing!
Don't know why I love stains so much but I do!
This is a superb tut! I have to try it out really soon.
I am so doing that! Beautiful idea!
Ready to try, thanks!
Thanks---Gracias
Awesome! Thanks for sharing!
Pages