Layout Fix #1: Part 1, Title & Contrast
I've been thinking about layout design lately, and how to go about teaching it. It's a complicated subject since there isn't really a "right" answer, and also I don't know what I'm talking about. I have no design training and work almost entirely off of instinct, which is obviously not helpful to anyone. So I've done a little reading, and I thought perhaps a quick way to try and figure out what I'm doing when I work on a layout would be to try and "fix" someone else's.
I say "fix" since just because I've moved things in a certain way doesn't make it right. With this exercise I'm trying to isolate different design principles that you can use in creating and fixing your own layouts. However, it's totally possible that you may prefer the original layout, or some step along the way. Please feel free to share your thoughts below in the comments.
So here's my first attempt. And thanks to Catherine for being the guinea pig in this project! (See instructions at the end to submit your own layout.)
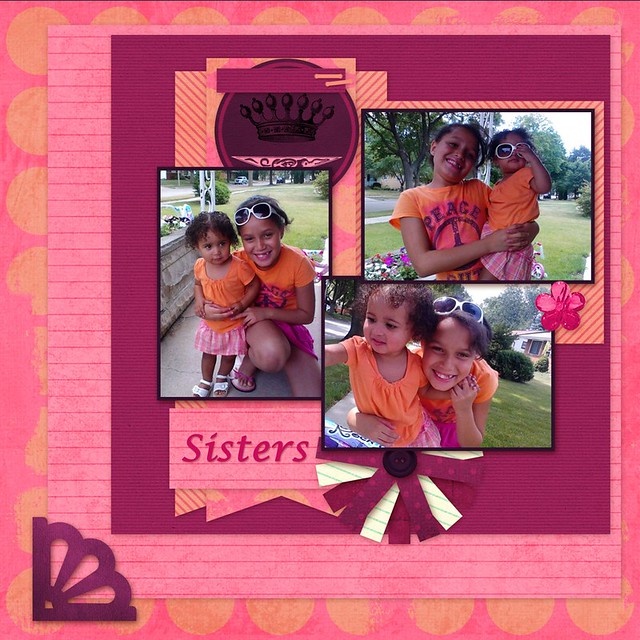
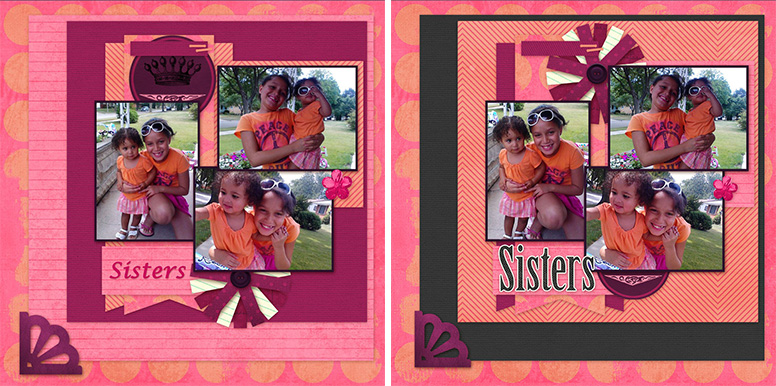
Here's the original. Overall, it's a nice layout. I like how the colors complement the photos and make it feel fun. The thing that jumps out at me right away (or actually, doesn't jump out) is the title. It's small and blending into the background, making the layout feel unfinished.
So here's the same layout, just with an adjustment to the tile.
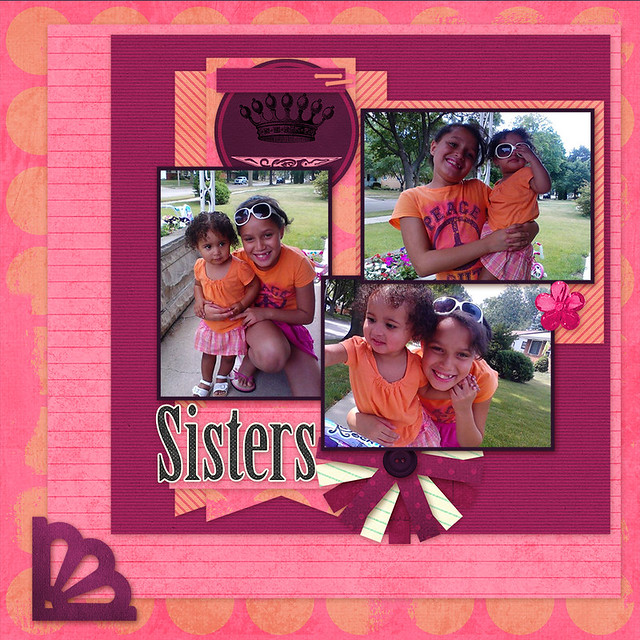
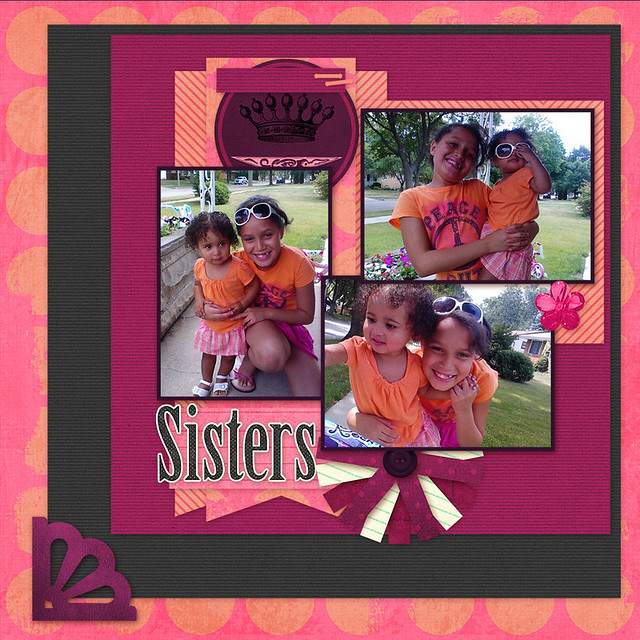
You'll notice that I chose a black alpha to use for the title. The second issue I noticed was a lack of contrast throughout the layout. Because the papers match the photos so well, and are all quite close on the color wheel (and BRIGHT!), everything gets mixed up together. So the next change I made was to add a little contrast to the page. The title already added a nice break from the bright, and now I just mixed in one contrasting paper.
Now to finish up, I've just moved around a couple of the papers, since adding in the black paper changed what papers were touching (I didn't like the purple stripes next to the black stripes). I've also readjusted the elements, switching the ones on top and bottom. The "hole" at the top was bigger, so I thought it needed the larger element. Now that the title is bigger, it doesn't need such a large element next to it. I also changed the crop on the photo to the left, so that it filled up more of the frame.
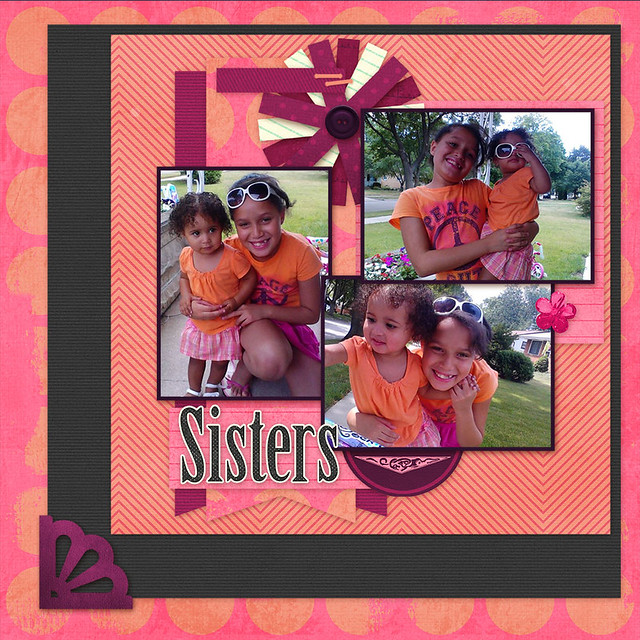
Before and after. What do you think? Does it actually look better now? Or did you prefer the original? Any other changes you'd have made?
I think with just a few tweaks, the layout has a more finished look. I'm pretty happy with this as a final product. I did make another version, that has been altered quite a bit from the original. I'll be sharing those changes with you next week.
If you have a layout you'd like me to "fix" please email it to [email protected]. You'll likely need to zip the file and use a file sharing service (Google Drive, Dropbox, etc) to share such a large file. I will reply to your email to let you know I've received it. If you haven't heard from me after a day or two, try sending it again.
Blog By

Subscribe to this blog
![]()
![]()
My Projects


Follow Marisa Lerin
Monthly archive
- November 2012 (9)
- December 2012 (37)
- January 2013 (17)
- February 2013 (13)
- March 2013 (20)
- April 2013 (26)
- May 2013 (29)
- June 2013 (9)
- July 2013 (8)
- August 2013 (13)
- September 2013 (16)
- October 2013 (14)
- November 2013 (16)
- December 2013 (12)
- January 2014 (15)
- February 2014 (9)
- March 2014 (15)
- April 2014 (11)
- May 2014 (4)
- June 2014 (9)
- July 2014 (8)
- August 2014 (7)
- September 2014 (8)
- October 2014 (13)
- November 2014 (6)
- December 2014 (3)
- January 2015 (13)
- February 2015 (14)
- March 2015 (14)
- April 2015 (13)
- May 2015 (12)
- June 2015 (11)
- July 2015 (10)
- August 2015 (8)
- September 2015 (7)
- October 2015 (10)
- November 2015 (8)
- December 2015 (10)
- January 2016 (7)
- February 2016 (6)
- March 2016 (8)
- April 2016 (7)
- May 2016 (8)
- June 2016 (8)
- July 2016 (6)
- August 2016 (5)
- September 2016 (8)
- October 2016 (8)
- November 2016 (11)
- December 2016 (7)
- January 2017 (6)
- February 2017 (12)
- March 2017 (10)
- April 2017 (7)
- May 2017 (9)
- June 2017 (9)
- July 2017 (10)
- August 2017 (7)
- September 2017 (11)
- October 2017 (8)
- November 2017 (9)
- December 2017 (8)
- January 2018 (8)
- February 2018 (8)
- March 2018 (8)
- April 2018 (4)
- May 2018 (9)
- June 2018 (9)
- July 2018 (4)
- August 2018 (5)
- September 2018 (13)
- October 2018 (19)
- November 2018 (18)
- December 2018 (14)
- January 2019 (23)
- February 2019 (20)
- March 2019 (17)
- April 2019 (14)
- May 2019 (17)
- June 2019 (14)
- July 2019 (8)
- August 2019 (3)
- September 2019 (14)
- October 2019 (17)
- November 2019 (16)
- December 2019 (6)
- January 2020 (14)
- February 2020 (20)
- March 2020 (16)
- April 2020 (18)
- May 2020 (19)
- June 2020 (16)
- July 2020 (8)
- August 2020 (5)
- September 2020 (8)
- October 2020 (10)
- November 2020 (10)
- December 2020 (7)
- January 2021 (4)
- February 2021 (9)
- March 2021 (8)
- April 2021 (7)
- May 2021 (7)
- June 2021 (7)
- July 2021 (10)
- August 2021 (7)
- September 2021 (8)
- October 2021 (5)
- November 2021 (7)
- December 2021 (6)
- January 2022 (5)
- February 2022 (7)
- March 2022 (9)
- April 2022 (6)
- May 2022 (7)
- June 2022 (4)
- July 2022 (2)
- August 2022 (1)
- September 2022 (3)
- October 2022 (6)
- November 2022 (4)
- December 2022 (6)
- January 2023 (4)
- February 2023 (5)
- March 2023 (6)
- April 2023 (5)
- May 2023 (5)
- June 2023 (5)
- July 2023 (5)
- August 2023 (5)
- September 2023 (5)
- October 2023 (4)
- November 2023 (4)
- December 2023 (5)
- January 2024 (4)
- February 2024 (5)
- March 2024 (5)
- April 2024 (2)
Recent Comments
Nice layouts!
Wow...Great work Catherine, Marisa,...observers and the Catherine on her redo, taking into account Marisa's direction and tip.
First let me say that I found myself having to open the window twice, so I could see the before and after while I was reading the comments left by folks. I LOVE how Marisa walked us through her steps and reasons as well....that what I was going for when I ended up opening 3 windows, the last was Catherine's own redo.
I think what she eventually did was what I had in mind. Marisa helped her think of popping or "contrast"...I to thought the first step was to strengthen the Title. Both Catherine and Marisa did this not only by increasing the sizes, but with contrast as well.
I leaned with some of the others and loved the purple paper, but that was just personal taste. The other thing that many went one way or the other on was when Marisa moved the flower up. Many including Marisa commented on the "weight" and size of the space when moving the paper flower to the top. But I think it was more that just weight and size, (heavy on the bottom, and also a balance) - I think part of why Marisa moved it up was because she was balancing the white. When she introduced it with the title, it needed to be separated and balanced on the page with the paper flower. Which leads me to my 2nd thing...after the title.
I would have loved to have been able to introduce a slight white shadowing behind the crowned emblem, if I could have...and then we have Catherine's redo. She switched to the white for the pop, using it in the title, and mats of the photos, and even the Love tag. If I would have stayed with Marisa's dark pop/contrasting, I personally would have probably double matted the photos with some of that purple paper.
Thanks Catherine & Marisa, for making us think about why we do some of the things we do, and giving us a place to chat about it!
I like your changes. I think adding black to your layout makes everything pop. It brings out the pictures more. The text change adds more visual interest also. But really I think it just depends on the look you want. First layout is a more muted soft layout.
I like the black background with the lighter foreground. I think it makes the black around the pictures stand out more, which in turn draws your eye to the pictures. I also like the title change. However, I liked the flower at the bottom rather than at the top.
I do like the newest layout best but I would have added another paper between the black and the one on top so we wouldn't see as much dark in the page. Also I would add some deeper shadows. I can't actually tell if there are any shadows because they appear so small. I like my pages to appear realistic.
Love all the comments that you all wrote! Makes it hard to write mine ;) I like both layouts! But the change of alpha gives it more body. I don't know if I would have taken the black paper in because now it looses the focus on the pictures (in my opinion, because my eyes get drawn to the black). And I would add a little bit more shadow. Designer rules or no rules at the end you just have to create something you love with the colors you love. Just playing around and stick to a idea makes you grow.
I was inspired to my own retake on my layout for this weeks challenge... with the "Title and Contrast" in mind. Here it is: https://www.digitalscrapbook.com/catherine-olson/gallery/tiana-and-kimberly-take-2-layout-challenge-old-sept-2013-sister...
Button = bottom (stupid auto correct)
Taste is a very subjective thing. There are some "rules" or design principles that help make a layout look easy on the eyes. Create a focal point - you did that very clever by adding the black background. Another thing is to try and put "heavy" objects on the button and lighter or smaller ones on the top of your layout. I would have left the paper flower where it was, I really like how Catherine made it stick out of the paper square just a tiny bit to create a little "tension". I probably would have moved the paper strip and staples down to add a date or place, to 'close' the layout.
I do like the orange paper on top of the black....it picks up the orange in the dot paper and lets the orange tshirts take the stage.
Thanks for this post. It's nice to see the revisions "in action", and the finished product looks great :)
I think it would be fun to have more than one person take the same photos and do 3 different looks and explain what they were thinking. I would love to be part of that team. I have taught classes like this before. There is no right or wrong, but you learn so many different things. You did a good job of explaining your changes.
I really liked your fix except I think the flower looks better where it used to be and the orange paper on top of the black just seems too much. The purple looked better in my opinion.
This is a great idea, Marisa, and something everyone should try. The way you have explained each change is helpful in understanding the reason behind each one, rather than just posting a before and after. There is much to learn from exercises such as these because, well, they make you think about the whys! I know you say it is intuitive for you, but there is still a LOT of thinking that happens on the right side of the brain - and being able to explain why you have made the change proves it...which is why there are art/design rules in the first place. :) This exercise reminds me of art school when we would all bring in the same 'solution' for a prescribed advertisement poster or album cover - and each would look so different - all good, but a few exceptionally so. I'll be watching this experiment and maybe even be brave enough to submit one for a critique fix! :)
Creating layouts is so subjective. As you said, there really isn't a right or wrong way to do them. That said, I do agree with your changes. I think that the bold title work definitely enhanced the already beautiful layout. I also agree that there did need to be some sort of solid neutral paper mixed in with all of the color (eek, I can't believe I said that...being a huge color fan myself). Regarding elements...again, it's so subjective. The only thing I try to do (and I'm definitely not a design pro at all) is provide some sort of balance. With the change in title that you did...I think it was the right move to switch around the elements.
Overall, the layout was fantastic to begin with...but I do think that your changes made the photos pop much more...and I think for most layouts, that tends to be the goal.
Hi Marisa, Cat =) I like the idea of the black paper, it really made the layout pop, but I´d put it on other position - maybe on the background or on the bigger banner. I don´t like this position that much, prefer the way the pink was "growing" to "become" purple on the third square paper, and it was one of the things that made the LO special to me. I´d also downsize the flower sequin. Love the title work - but, with those big letters. don´t you think that the horizontal scrap of paper behind it isn´t necessary? Also love that the button on the big flower isn´t partially hidden by the photo anymore, but I like the crown stamp - I´d probably find out a form to keep it shown, even if partially hidden somewhere. I agree with Mersija about the tab with staples... I like both layouts.
Now I want to rework it too, lol. :)
I liked all the changes you made up until you changed out the raspberry paper & moved the elements. I think changing out that 1 paper to black, and changing the alpha on the "Sisters" title were fabulous - it really made everything "pop" more. But I'm no designer either. ;) JMHO...
I like all the background changes and the change in the title made a big difference. However, I like the flower down the bottom and I agree with Mersija that the burgundy behind the pictures from the original layout looked pretty good. It really helps to look at the different arrangements side by side. When I am working with quilt fabrics I take pictures of various arrangements then compare them. Digital scrapbooking lends itself to saving several layouts to compare and trying something you think won't work. Sometimes those crazy ideas look the best.
I think it looks good Marisa,i do like the small changes you've made on her layout,however you should have taken the tab with the staples on it and moved it somewhere else.It doesn't look good there at all over the flower like that.I am not that great with scrap talk,but i do have an eye for design,tho i have not had time to do any layouts i had planned.Also,i just noticed something else i would change,but that's just my opinion.I would add the black paper behind the pink paper or place that burgundy color behind it,it just blends in with the orange/striped paper a lil' and i don't like that.Again,it's just my own opinion,we all have are own styles and how and what we will add.