Hello all I do hope some one can help me
Now please forgive me but I am not a scrapbook person so I don't do many LO's as such I tend to print everything off for my cards and put them together and I cannot for the life of me use photo shop I have tried a few time and it may as well be in another universe let alone a different language even serif I can't get to grips with so in very and I mean very simple terms could someone tell me how to tale a a background from and outline
By this I mean I use a lot of digi stamps which is basically line art so of course they have a white background but you can get them so all you can see is the out line and nothing else does any one know how I can do this to existing line art I have it's just that I have a birthday coming up in couple of months and have an idea for a card but I want to try and make my own paper using this image but with the white I can't do it obviously
don't forget I need very simple terms don't get me wrong I'm not stupid just not very technical lol
any help would be grately received
Jacki xx
PHOTOSHOP: How do I delete a white background from a stamp?
Tue, 04/23/2013 - 13:37
#1

PHOTOSHOP: How do I delete a white background from a stamp?
Jacki, can you check if the digistamp you are trying to delete the white background is a png file or a jpg file?
Also, why are you trying to extract? To put it over a paper?
I'm not great at extracting, which is what it sounds like you need to do. Hopefully, someone who's more familiar with it can help you.
You could try to create your own word art that has a similar look which might be easier for someone who is new to PS. There are tons of free fonts available. If you play with the size, orientation of the words, and the fonts, you could probably come up with something you love. Just remember to save it without a background layer as a png so that it remains transparent.
If the image is just black & white and you have access to Photoshop, it's quite easy to make it a brush and then use it wherever you'd like.
Open the image in Photoshop and go to Edit --> Define Brush Preset
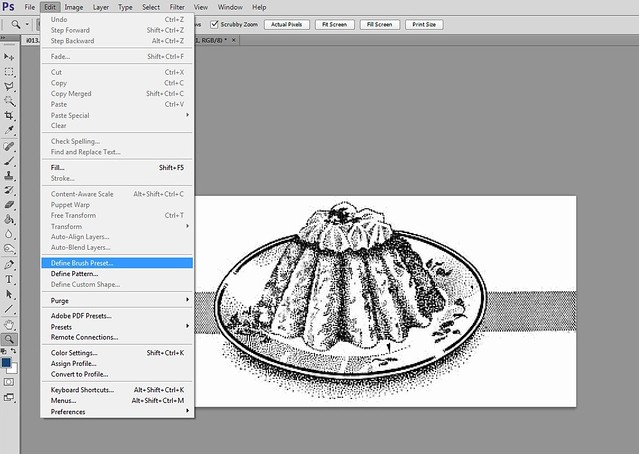
Then on a new canvas, find the new brush and use it!

This is something I have done many times and how easy it is depends on the image itself. Basically you need to select either the white part or the black part of the image with the magic wand. I use PSE. Make sure your image is a layer not a background, right click on the layer and select turn background into layer. With the magic wand select either the black or the white. Of there are lots of small black strokes then choose white. If you choose white you can delete as you go, if you choose black, hold down the shift key until all the black has been selected, then Control and x, the Control and V. This will put the image back on a new layer. Hide the original layer, then check your image. If you have missed bits, use Control and Z to go back in stages until you see your selection (marching ants) choose the magic wand again, hold the shift and select the missing bits. If you start with a simple digital stamp this is easy, if you have a complex black and white image it is harder, particularly the vintage digital stamps as they often have grey areas. You may need to alter the percentage of the magic wand, 100% sometimes picks up everything!
OK thanks for this as I said Photo shop and serif are something I find really hard to use but will give it a go but I can see me going with my other option yes I wanted to make a paper with it so all the colour from the paper came through and you just see the outline of the image on there you people are so talented I wish I could use thos stuff and create my own lol
Jacki xx
I´d do it in a very different way, lol. Duplicate the black and white picture on the top of the colored layer you want to put behind and adjust blending options till find one that make the white desappear. If the black becomes faded, i´d adjust either on levels, brightness/contrast or hue/saturation.
I always think it´s incredible on how photoshop has lots of solutions to the same problem.
When I get stuck, I always remember to search the menu and go through each menu item, when I cannot remember where it is located.
Jackie, I find that the best way to learn a program like PS, is to concentrate on ONE thing at a time. Find something you want to learn, then find tutorials, either video or written that shows how to do just that ONE thing. Then watch/read them over and over, while you are working in the program following step by step. And just keep doing that one thing over and over until you can remember how to do it with out having to look at the tutorial. I have done this with a few programs that seem overwhelming at first. But if you break it down into simple things, and only think about one thing, it makes it a lot easier. And before you know it, you will start picking things up much easier.
At first it may seem more difficult, because you don't know where this or that tool is, or how to get to something else that they are using, but again going slow, repeating sections of the video over and over, stopping the video until you find what they are using, all help you to learn.
I also will spend some time each day, going through the things I learned and repeating them. I may not save my work, but just going through the steps on how to do something will help cement it in my mind until I can do it with out thinking about it. The big thing for me is to keep doing it often. If I learn something and then don't use it for even a few days, I won't remember it the next time I want to use it, and have to go back to the tutorial.
And try to spend some time learning the program without having a deadline on needing something. If you feel pressure to get something done, because you need it "yesterday" is not a good way to learn, and remember. Give yourself time to learn, and absorb what you have learned, or you will just get frustrated.
I'm know I'm late to this conversation, but I hope you were able to figure out what you needed to do, and have started to learn PS or CAP (Craft Artist Pro from Serif)
I have found the best source to be the help section of Adobe itself. Just type in the search: PSE (number) delete background and you get loads of help. Or CS (number) delete background.
I am a member for 10 years at least now of PSE Users. It's a monthly magazine with tips and tutorials plus access to the website where all tutorials are archived and even more. At the moment they are starting to focus on digital scrapbooking and we had this month Renee Parson as a guest teacher, learning how to make a beautiful chart pie with different papers and photos. Stunning. I learned lots, a great variety in subject. I'm not sure what the monthly price is for a subscription I have subscribed for 5 years. Every now and than they put all info on a DVD and some and that is also incredibly useful to have it just at your fingertips. They include the original files they use to teach so you can just follow along.
here is their website PhotoshopElementsUsers Techniques.
OMGosh I had this swirly thing I wanted to use but it was a jpg with the white background "BAM" it's now transparent
Big big thanks
Love the willingness to help others that I am finding on these forums! Wish I had been part of this forum a long time ago, would have saved me many hours of frustration.
Is this a totally white background or one with shadows? .... a totally white background can be removed by simply using the magic eraser tool. If your element you are saving is light coloured set your tolerance lower in percentage until it is where it only removes the background.
If it is coloured one of the best ways I have found and the fastest is to create a new transparent layer on top of the element or photo and paint over what you want to keep, lowering the tolerance level of the layer until you can see the lower layer. Paint over everything you want to keep up to the halo effect on the edges .... if you take those too you will have a darker outline around what you keep ....bring the transparency level of the painted layer back to 100%... when you have your painted layer done move it below your original layer. Highlight the original top layer, click in the little layer thumbnail of the lower layer holding down control to select the outline of the lower layer,look for any pixels that haven't been painted over, go to select and inverse and then hit backspace .... your background is gone and you don't have any stray pixels left over. I find this takes me just a few minutes without working back and forth etc and works every time in elements